
This step should be relatively painless if you followed the guide and already have hosting set up and an available name picked out. Click here to pick out a name and click here to set up a hosting account. Once you have decided on an available domain name and you set up a hosting account, click here to proceed to www.GoDaddy.com.
- Enter your selected domain and appropriate extension in the box in the middle of the page and press go.
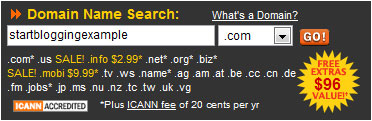
- You should see something like “STARTBLOGGINGEXAMPLE.COM is available!” If your domain name is taken, keep trying until you find an available one. Once you find an available domain, select continue at the bottom.
- If there are any other available extensions, you will be offered them on the next page. Unless you really, really want them, click “No thanks. Continue to checkout…” at the bottom of the page. As for any special offers GoDaddy has, skip these and click “No thanks. Continue to checkout…”
- Here you will have to either login with an established account or create a new one. Fill in the appropriate information and select continue.
- Now, you will be thrown a lot of information on the next page, but use the following graphic and corresponding numbers to correctly fill it in.
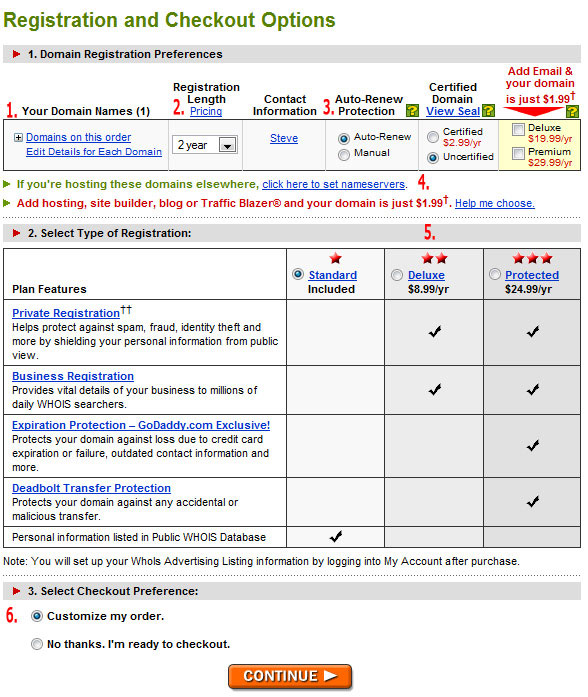
- Verify that you have the correct domain on order by clicking the plus sign.
- Choose the length of time the domain will be yours. I suggest selecting 1 year. Renewing is very simple
- Auto-Renew protection should be set at your preference. I prefer to manually renew my domain just so I can keep track of what’s going in and out of my bank account.
- This is the most important part of this step. Click on ‘click here to set nameservers’ and four boxes will pop up. Fill in the correct nameservers as provided by HostGator. Remember this email I told you to print out?
Your Domain: yourdomain.com
Your Username: username
Your Password: password
Your sites IP address:
12.34.567.890Your name servers:
ns123.hostgator.com
ns124.hostgator.com
———————-
Until your DNS has changed over to our nameservers, you can access your cPanel at:
http://12.34.567.890/cpanelYou can view your site before the DNS has been resolved at:
http://12.34.567.890/~username/There is a file called hostgator.html in your public_html folder. This page will give you basic links on getting started. Your welcome to delete this file or if you upload an index.html file in public_html, then the hostgator.html file will not come up by default.
Please read
http://www.hostgator.com/gettingstarted.html for all the information needed to manage your account.Sincerely,
The Hostgator TeamWell, fill in the box with the nameservers provided. You only need to fill in two and it should look like the image below. Do not skip this step!

- There are two types of registration for you to consider: standard and private. If you choose standard, anyone will be able to look up the name, address, and phone number you used to register the domain. However, on the next page, you will be able to select a private registration for $6.99 and hide your information.
- Finally, select ‘No thanks. I’m ready to checkout’ and click continue.
- On this next page, be sure to thoroughly review your order. If you wish to hide your information from the public, select the private box and then click update. If everything looks correct, select your payment method and click checkout now.
- This is the last step! Fill in your personal information and continue with the checkout process. You’ll have to verify that you’re a human, and then you can place your order.
Congratulations! You now own your very own domain. GoDaddy will send you a few emails confirming your order. I suggest either printing these out or saving them to your computer just to be safe. Now that you have your domain and hosting ordered, we need to confirm that everything is working correctly. However, it can take up to 24 HOURS for your domain to propagate with the DNS, which means to become active. Normally, it is instantaneous, but there can be delays.
Click here learn how to verify that everything is working correctly.
1 thought on “Purchase the Domain”
Comments are closed.